Version: 1.8
Homepage: https://tablecruncher.com/
Supported file formats
Tablecruncher is a CSV editor. While there is no offical definition for CSV files, this editor adheres to the de-facto standard that’s given in RFC4180 [1]. Additionally Tablecruncher tries to be as liberal as possible when opening third-party CSV files.
Tablecruncher supports opening and storing CSV files with these separators: comma, semicolon, tab, colon(:), pipe(|).
Supported encodings for opening and saving:
-
UTF-8
-
UTF-16LE
-
UTF-16BE
-
Windows 1252
-
Latin-1 (ISO-8859-1)
Support for more encodings, especially Latin-9 (ISO-8859-15), is planned for later versions.
Tablecruncher recognizes Unix style (LF = 0x0A or \n), windows style (CRLF = 0x0D0A or \r\n) and classic MacOS style (CR = 0x0D or \r) line endings automatically.
Opening a CSV file
When opening a CSV file, Tablecruncher guesses the encoding as well as the used separator of the given file. If Tablecruncher is not convinced that the guess is sufficiently correct, it opens an additional dialog and asks the user to provide the correct encoding as well as the used separator. If the file is roughly 50 MB or larger Tablecruncher always asks the user to provide the correct format, because guessing is a rather time consuming task.
There’s an "Open with format …" function that always asks the user for the used file format. This is intended for cases when you think that Tablecruncher will guess the format incorrectly. If Tablecruncher opened a file with incorrect settings, just use "Reopen …" to re-open it while asking you for the correct import settings.
You can also open a file by dropping it onto the application symbol in your dock.
Storing a CSV file
An opened CSV file is stored using the format that’s showing in the toolbar (by default it reads "UTF-8|COMMA"). To change this just click this icon and edit the settings. When you want to change the format of a CSV file, you’ll open the file, click the setting in the toolbar and edit it as desired. Then just hit the "Save" button to store the CSV file. You can also use "File > Set CSV Properties …" to get to that property window.
You can also choose your desired quoting style:
-
Only when needed: That’s the current quoting strategy where only fields that are required by RFC 4180 are quoted.
-
On all fields: Every field is quoted, no matter what the content looks like.
-
Around all strings: Only fields that look like strings are quoted.
According to RFC 4180 only fields containing a line break, double quotes or the separator character are required to be quoted. Some CSV tools though expect all fields to be quoted, while other tools expect only non-numeric fields to be enclosed in quotes. With this option, you’re able to create CSV files that should satisfy all the different expectations of those tools.
Dealing with Escape characters
According to RFC 4180, there’s no escape character needed. A quote within a cell is stored as two quote characters. This means that the quote character is effectively used as an escape character as well. Since 0.9.8, when opening files you can choose whether you want a quote or a backslash as an escape character. Keep in mind though that this choice is only valid for opening a file. When you store a file Tablecruncher always uses a quote character to escape a quote in a cell.
Editing
To edit a cell just start typing. Typing TAB or ENTER finishes editing and stores the entered content in the cell, while ESC undos the previous change. Pressing BACKSPACE clears the content of the currently selected cells.
When a cell contains a newline character, TAB or ENTER automatically opens a larger editor window to open the multiline content of that cell. It’s also possible to open this editor window by pressing CMD and RETURN (on keyboards without a numpad, please press FN-CMD-ENTER) or choosing Edit > Edit cell …. A cell now displays two red dots in the lower right corner of that cell, when the cell content is not fully displayed.
To insert special characters while editing a cell inline (eg. without the additional editor window), you can use these shortcuts: Newline: CTRL-J Tab: CTRL-I
Copy and paste, insert and deleting rows as well as columns should work as expected. Paste interprets the data stored in the clipboard as CSV and parses it before inserting. The command "Paste into Selection" pastes the content of the clipboard into all currently selected cells, in this case without any CSV parsing.
When copying cells the currently selected CSV definitions are used. These definitions can be shown by File > Info and changed by clicking the text field left of "Headers" that should read something like "UTF-8 …" and shows the currently used CSV definition.
Navigation
You can navigate through your CSV file using the arrow keys. Using FN key and the arrow keys jumps to the beginning or end of a line or one window height up or down.
"Jump to Cell …" in the "View" menu allows you to jump to an arbitrary cell. If you just enter a number, you jump to the row represented by that number. If you enter a colon (":"), followed by a column name or column number, you jump to that column. Column name matching is a case insensitive substring match, so "umbe" matches column names like "number" or "Numbers". You can combine row and column targets like this ROW:COLUMN.
Some examples:
999        Jump to line 999, stay in your current column
:city      Jump to the first column in your row that matches "city"
42:city    Jump to the first column that matches "city" in row 42.
Undo
Tablecruncher stores all changes to a file as Undo states in memory. This means you can undo every edit of your CSV file. For really large files this can take a lot of your computer’s memory (RAM), so since version 0.9.9.0 you can disable Undo functionality Edit > Disable Undo …. To learn more about dealing with really large files, please read our tutorial for large files.
Undo has an infinite undo buffer. Be careful with large files! Changes like deleting or adding a row or a column store a copy of the whole table in memory. You may run out of memory and your system may become rather slow. Editing single cells though doesn’t copy the whole table and should not cause those problems.
If your file is really large (e.g. more than 20 percent of RAM) you can disable Undo functionality (Edit > Disable Undo …).
Selecting and flagging cells
A selection are one or more adjacent cells that have been highlighted. To select multiple cells you can use the keyboard as well as the mouse. Click and drag with your mouse selects all cells from the cell you clicked to the cell you’re pointing at when you release the mouse. If you want to select a really large selection of your table, it’s easier to select a cell and shift-click another cell. Now all cells between those cells are selected. Pressing shift and one of the cursor keys also selects multiple cells. To select one complete column just click onto that column header. If you want multiple adjacent columns to be selected, click the first column header and drag your mouse over those other columns you want to be selected. The same works for rows accordingly.
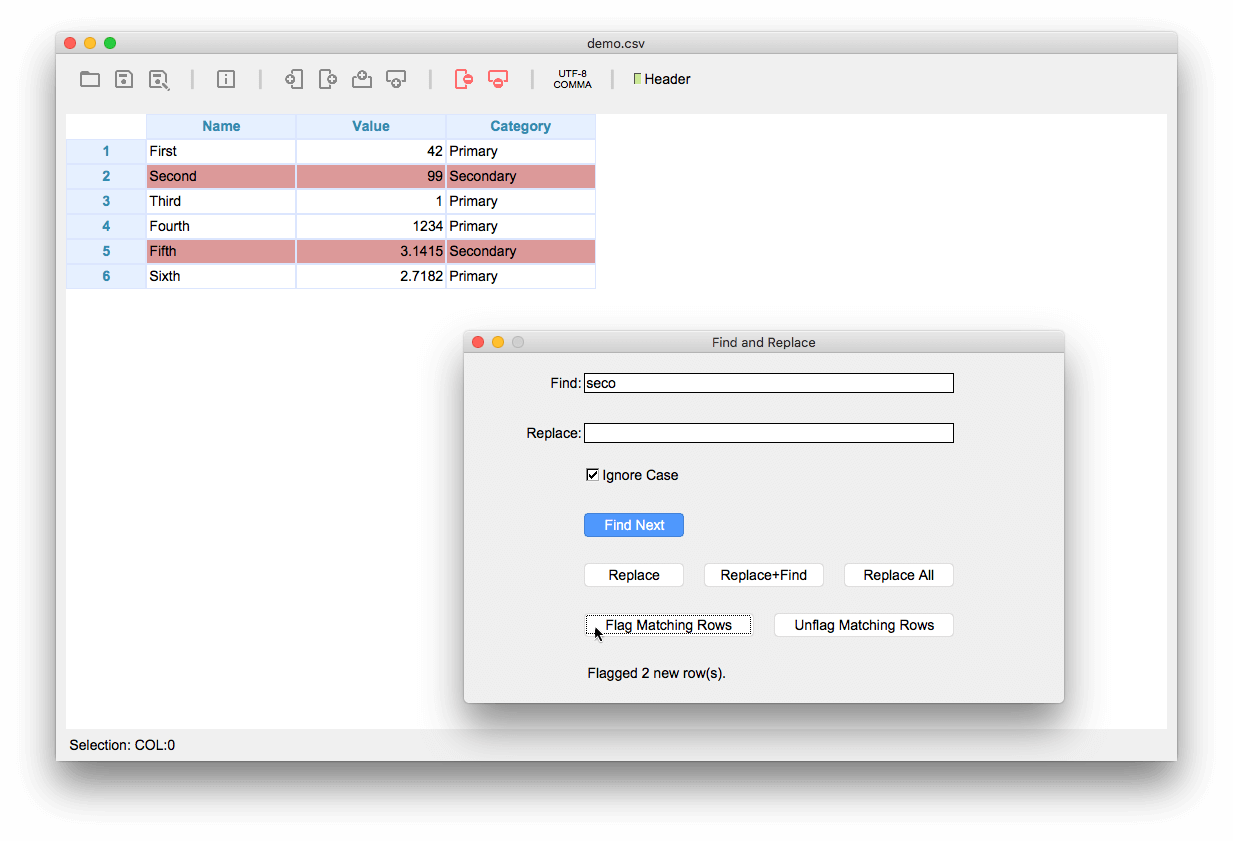 The improved Find and Replace dialog lets you easily flag rows by their content.
In addition to selecting cells, you can flag an arbitrary number of rows. Just click onto the row header while pressing the option (alt) key. Flagged rows are shown with a red background and need not be adjacent. Flagging is especially useful with the Find and Replace dialog. You can click "Flag Matching Rows" to flag all rows that meet your search criteria. If you want to flag rows that don’t match a given search pattern, click "Flag Matching Rows" and then choose "Data Invert Flagged Row(s)".
Flagging is also helpful when working with [macros]: You can flag rows based on all kind of conditions by your macro code. Then you may review those rows and for example delete them with the command "Data > Delete Flagged Row(s) …". You can unflag a flagged row by option-clicking on the row header of a flagged row.
Using "View > Jump to Next Flagged Row …" you can traverse all flagged rows in your table. The shortcut for this function is CMD-j. There’s also a function to jump to the previous flagged row, just press CMD-SHIFT-j.
You can export flagged rows by using "Data > Export Flagged Row(s) …". All currently flagged rows are stored in a new CSV file. The CSV definition is the same as that of the currently open file from which you are exporting. Together with the "Flag Matching Rows" feature of "Find and Replace", you can easily select and export a subset of your CSV file.
Find and Replace
Find and replace functionality is provided using a single dialog box. If there are no cells selected, the complete table is searched. Clicking "Find Next" or pressing ENTER starts searching. If a cell is found it is highlighted with a green background. The next find starts from that last found position. When you close the search dialog the last found position is reset.

"Replace" replaces the text in "Find" with the text in "Replace", but only at the cell where the last match occurred or at the selected cell. "Replace+Find" replaces the text in the current cell and stars a new search from that cell. "Replace All" replaces all occurrences of "Find" with "Replace" in the whole table or in the selection if an area has been selected.
"Flag Matching Rows" flags all rows if a cell in this row is successfully found. Searches the complete table or only within the selection when multiple cells have been selected.
If "Ignore Case" is selected all searching is done ignoring the case of the text to find.
"Scope" describes the cells (like Full Table or Selection( A:1 > C:3)) find and replace will be working on.
Regular Expressions
"Find and Replace" accepts Regular Expressions (Regex) as defined by ECMAScript 5 (ES 5). When "Use regular expression" is activated, the content of "Find" is considered a Regex search pattern and is used for searching, replacing and flagging. The "Replace" string can containt backreferences ($1, $2, etc.) to insert the contents of capturing groups. For further details please see the documentation from the used library Duktape [2].
Here are some examples of what you can achieve with Regular Expressions in the Find and Replace dialog.
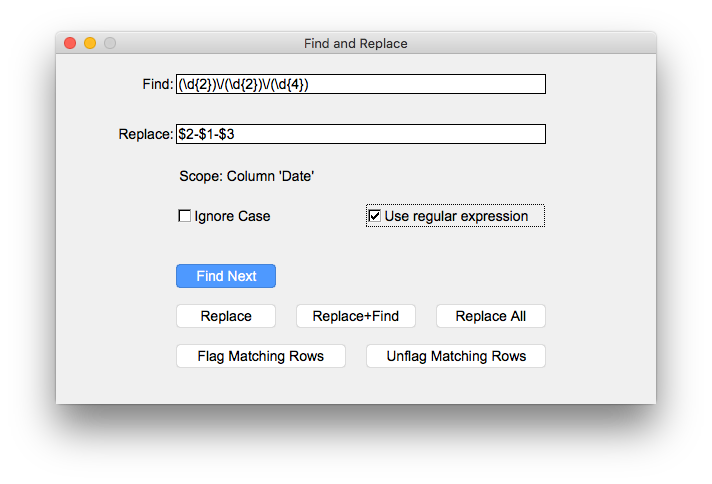
Change date from US format (mm/dd/yyyy) to ISO 8601 (dd-mm-yyyy)
Select the column containing the dates in US format, open Find and Replace (CMD-F), enter the pattern and replace string as shown below and click "Replace All".
Find: (\d{2})\/(\d{2})\/(\d{4})
Replace: $2-$1-$3
Remove leading and trailing whitespace
Sometimes there are leading or trailing whitespace characters like SPACE or TAB in some cells that are hard to detect visually. With a simple Regular Expression you can remove such whitespace from your CSV data. If you’re not sure what rows your Regular Expression is matching, just click "Flag All Matching" rows before executing "Replace All". This will highlight all rows your pattern matches and you can verify the pattern is correct.
Find: (^\s+)|(\s+$)
Replace: [must be empty]
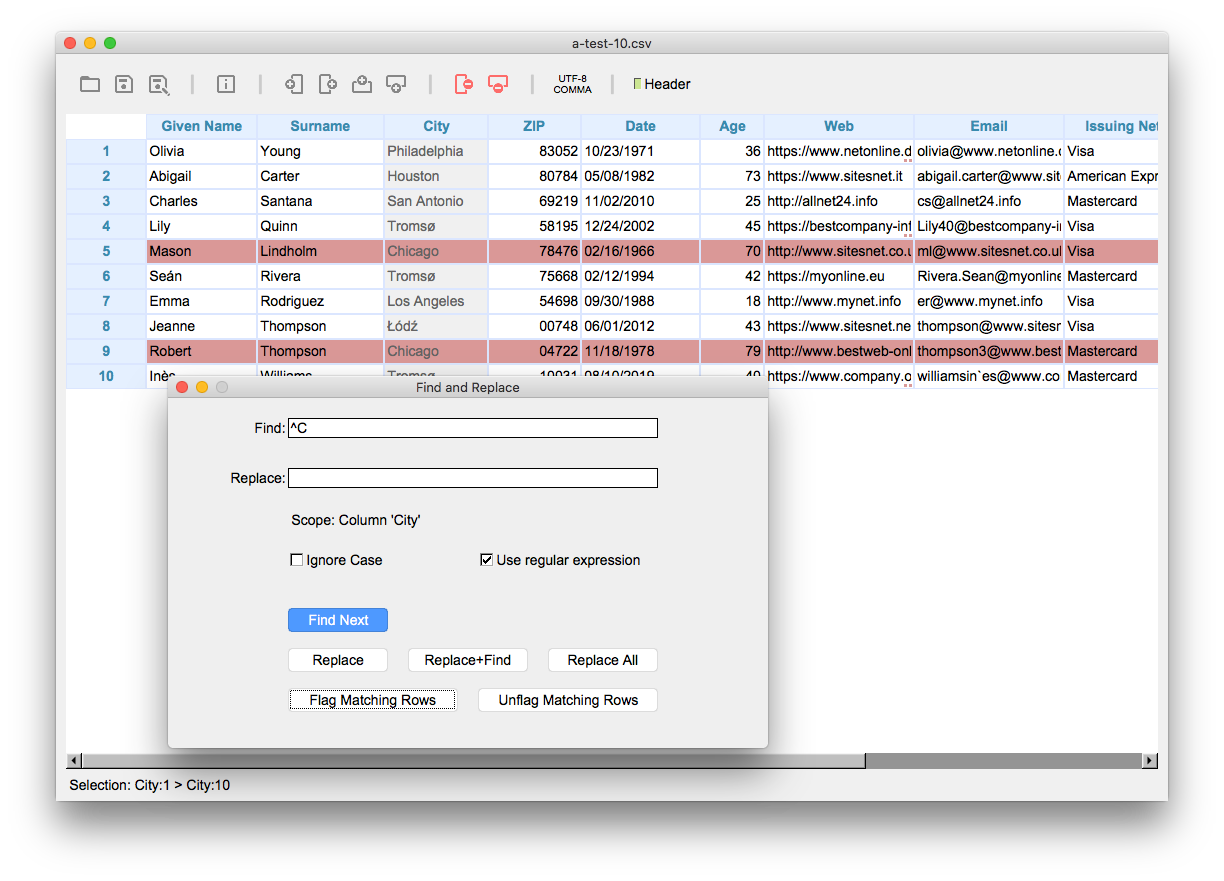
Flag all rows that start with a given letter
Select the column containing the data (in the image shown below we use "City"), press CMD-F, enter the search pattern and click "Flag Matching Rows"
Find: ^C
Flag rows that don’t match a given number format
Regular Expressions are extremely useful to validate your data. To check if the numbers in a selected area are well-formed, use a Regular Expression as shown below. This example checks for cells optionally starting with a minus sign, followed by an arbitrary number (at least one) of digits. Optionally these digits are then followed by a dot and an arbitrary number of digits again.
Find: ^\-?\d+(\.\d+)?$
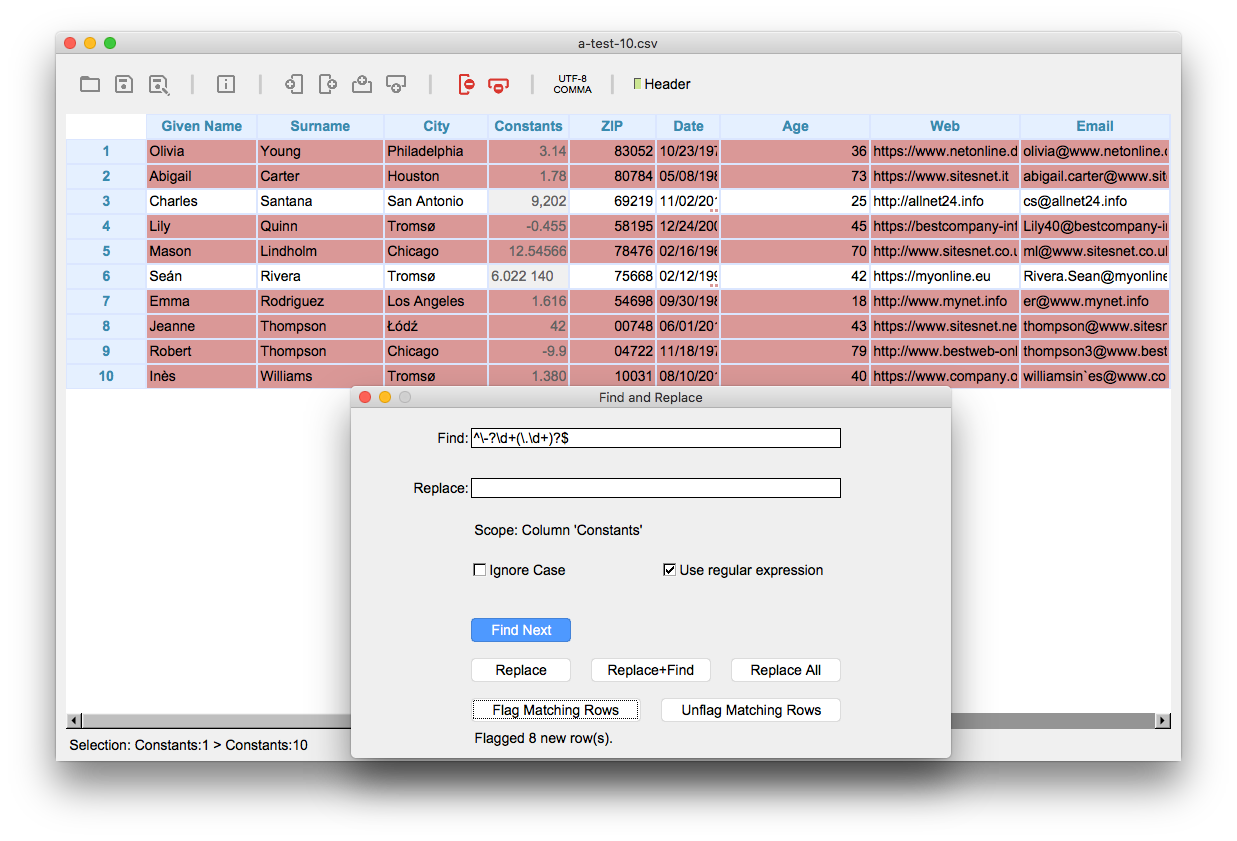
When you click "Flag Matching Rows", all rows that match the given format in the selected column are flagged. Choose "Data > Invert Flagged Row(s)" to invert the rows that are flagged. Now only the rows that don’t match our search pattern are flagged. In the example shown in the figure above, row 2 doesn’t match as there’s a comma instead of a dot. And in row 6 there’s an additional whitespace character in the cell.
Unicode in Regular Expressions
Regular Expressions support Unicode characters within the Basic Multilingual Plane (BMP). Any non-BMP characters should be processed as well, but there is no way to express such characters in patterns. In compliance with ES 5, character classes like "\w" only match ASCII characters (0-9, A-z); in compliance with ES 5 there’s also no support for Unicode character properties like p{L}.
Check Data Consistency
Tablecruncher warns you automatically when opening a file with inconsistent row lenghts. This check can only be done while you open a file. Once a file has been opened and parsed by Tablecruncher, the application ensures that all rows have the same number of columns.
Since version 1.6 there’s a new function to check the consistency of the data within a single column. When you use Data > Check Data Consistency …, the currently selected column is checked for potentially inconsistent data. All rows that seem to have inconsistent data are flagged and can thus be easily checked by the user.
 The first column contains numbers with a decimal comma instead a decimal point.
Other functions
The "Info" dialog shows the filename (if given), the size of the table the CSV is representing and the format that is currently used.
When activating the "Header" option in the toolbar the first line of the CSV table is considered as a header row. The column names are then represented by the first row. To edit the header row, switch off "Header", edit the fields and then activate "Header" again.
In the "Edit" menu there are commands to move a column left or right.
"Sort …" in the "Data" menu lets you sort the rows of the table according to the content of the chosen column. You may also define the sorting order and the type of sorting (numerical or string). As a shortcut, right-clicking a colum header opens the sort window with the appropriate column prefilled. When using the shortcut, Tablecruncher preselects the sort type based on the column content.
With "Split column …" in the "Edit" menu you can split a single column into two columns, providing a string where the column contents should be split. The column gets split at the first occurence of the provided split string. If you want to split a column into more than two columns, just call the Spit command multiple times.
"Merge columns …", also located in the "Edit" menu, merges two adjacent columns into one column. You can provide an additional glue string that is set between the contents of the merged cells.
Split CSV
To split the currently active CSV file into smaller files, use File > Split CSV …. You’ll be asked to enter the number of rows that should be stored within a single file. Tablecruncher then exports the CSV file into several smaller files each containing the number of rows that have been given. The files are named automatically, containing "split-0", "split-1" and so on.
For example, when the original file containing 1000 rows is named example.csv and it gets split into files with 400 rows each, Tablecruncher will create these three files:
example.split-0.csv    *Contains the first 400 rows*
example.split-1.csv    *Contains rows 401 to 800*
example.split-2.csv    *Contains the remaining 200 rows*
Please be aware that files already existing with these names will be overwritten!
Export JSON
File > Export JSON … exports the data in the current window as a JSON file. The JSON format depends on the kind of data you’re using. When the "Header" option is activated, the data is stored as an array of objects, where the name of the header cells are the keys and the values are the cells from this column. Without an active header row, the exported JSON is just an array of arrays. Values are stored as integers, doubles or strings. If a cell with an otherwise valid integer or double number contains leading whitespace, the cell content is regarded as a number and the value is stored as such. When a cell contains trailing whitespace though, that cell is exported as a string.
Macros
Tablecruncher offers a powerful macro language. You can use Javascript to access and modify the data in the CSV table.
Use Macro > Execute Macro … to access the new macro functionality. On the left there are the macros that are alreay defined. You can add a new macro by clicking the "+" icon below the macro list or delete a macro by clicking "-". The large editor on the right contains the macro source code. Here you define your Javascript code that is executed when you click on the "Execute" button.
These API functions are present to access the CSV data in the editor:
-
getInt(r,c): gets the content of the cell at the r-th row and the c-th column as an integer.
-
getFloat(r,c): gets the content of the cell at the r-th row and the c-th column as a float.
-
getString(r,c): gets the content of the cell at the r-th row and the c-th column as a string.
-
setCell(r,c,value): sets the content of the cell at the r-th row and the c-th column to the given "value".
-
flagRow(r): the r-th row is flagged and can later be deleted by the user.
-
println(val1, val2, ...): shows the contents of val1, val2 etc. in the macro window log area. A line break is added after every call to println.
All indices to the API functions are 0-based. So the top-most cell is called A1 in the interface, but it is addressed by r=0 and c=0. To address cell C2 for example, you have to use these parameters: r=1 and c=2.
The current selection is provided to the Javascript source in the predefined variables ROWMIN, ROWMAX, COLMIN and COLMAX.
Beginning with version 1.8, there are two additional variables: _ROWS contains the number of rows in the grid, _COLS the number of columns.
A common task is to operate on all rows in a given colum. To do this select a colum and use the following Javascript loop to access all cells in the selected column:
for( r = ROWMIN; r<=ROWMAX; ++r ) {
        // do something using the provided API functions
}
The button "Insert Loop" inserts that loop code at the cursor position to make macro development even easier.
For example the following code normalizes the numeric values in the selected column so that the maximum value in that column is 1.
// Normalize
var max = getFloat(ROWMIN,COLMIN);
for( r = ROWMIN+1; r<=ROWMAX; ++r) {
  if( getFloat(r,COLMIN) > max ) {
    max = getFloat(r,COLMIN);
  }
}
if( max > 0 ) {
  for( r = ROWMIN; r<=ROWMAX; ++r) {
    var elem = getFloat(r,COLMIN) / max;
    setCell(r,COLMIN,elem);
  }
}
Updates
If the optional update check is activated in the Preferences window, Tablecruncher regularly checks for the availability of newer versions. To update to a newer version, just download this version and put the application "Tablecruncher" into your "Application" folder.